
This page last updated on Friday, October 13, 2006 at 9:45:56 AM
| Home | | ATV | | ATV Centre | | Schools | | Fenton Relay | | Antenna Theory | | Other Pages |
Basic Antenna Theory
Radio waves are generated by electrons accelerating in the antenna.
Consider a transmitter perpendicular to the ground. The electrons in the antenna, when a signal is applied, are changing their velocities continuously (i.e. moving up and down very quickly) in response to the applied signal.
For a station that broadcasts at a wavelength of 1500m, the antenna needs to be 750m long. This is because there is a 'virtual antenna' caused by the aerial being earthed in the ground:
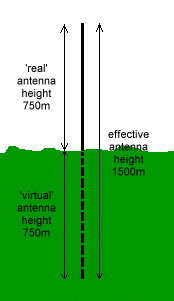
The transmitting aerial (and the receiving aerial) need only be half-the-wavelength tall.
Now if this transmitter has no directional properties (i.e. it radiates in all directions equally), it has a coverage area, assuming completely flat ground, that is a perfect circle:
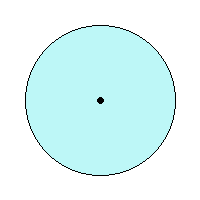
(View from above - antenna in centre; blue is coverage area)
Broadcasters rarely use a non-directional aerial though. It is possible to 'force' the energy radiated by the transmitter into particular directions - the aerial becomes directional. Directional aerials are used to great effect near the coasts of the UK, where the broadcasters do not want their signal to be easily picked up on the continent.
It is important that signal doesn't leak onto the continent since i) continental stations use the same frequencies and leaking signal would cause interference and ii) some programme broadcast rights apply to the UK only.
Under unusual weather conditions, despite the best efforts of broadcasters both in this country and abroad, signals travel much further than they normally would and interfere with reception of stations using the same channel, causing co-channel intereference.
Let's switch the emphasis from the transmitting aerial to the receiving aerial. Similar principles apply for receiving aerials as for transmitters as above.
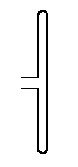
The Half-Wave Dipole
There is only one part of a receiving aerial that is active, i.e. does the receiving and is connected to the TV/radio set. This active element is called the dipole. The simplest design of antenna would consist of a dipole only:
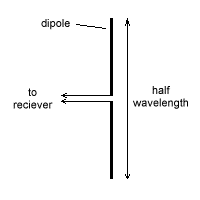
A half-wave dipole
In the diagram above, there are two wires marked 'to receiver.' For UHF and VHF, one wire will be the copper-core and the other the copper braiding of a co-axial cable.
Before we proceed, a quick word about gain. Although having a technical definition, for us 'gain' can mean "the effectiveness with which a receiving aerial receives a signal."
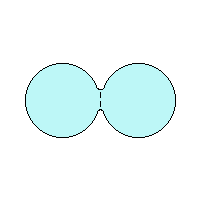
The diagram below shows the reception pattern of a half-wave dipole. The blue area is where the gain is higher than a certain value; the dipole is in the centre:
We can change the directivity of the aerial by adding other elements. Any other elements that we add to the basic half-wave dipole are called passive elements and are not connected electrically to the dipole.
There are two types of passive elements:
Directors
Directors alter the directivity of the aerial so that the aerial's gain is improved in front of the dipole. Most aerials have more than one director, and the more directors the aerial has the better the aerial is at picking out the signal from the required source and rejecting signals from other angles.
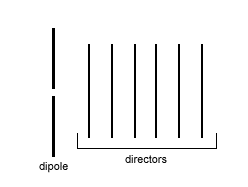
These diagrams do not show the cross-bar that holds all the elements in place as it does not much affect the characteristics of the aerial.
The spacing between the directors, diameter of the tubing used and the spacing between the first director and the dipole are important in practice but will be disregarded here. The length of the directors governs the bandwidth of the aerial (over which channels it is effective), but suffice it to say that it is about 75% the length of the dipole.
The gain of the dipole with directors in place looks like this:
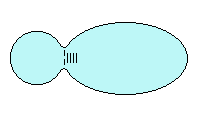
Notice how the gain is now more focused in the direction of the directors.
As stated earlier, the more directors an aerial has the more focused the gain is in the direction of the directors. Every new director added becomes less effective though, and in practice it is only worth adding 18-20 directors to the aerial, as any more than this wouldn't increase the gain very much.
On the diagram above, the aerial still has some gain at the rear - in other words, it can still receive signals from behind. This is known as a low front-to-back ratio.
The Reflector
To improve the front-to-back ratio we can add the second type of passive element, a reflector. The reflector reflects signal coming in from the back of the aerial whilst improving the forward gain.
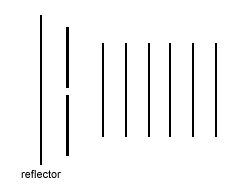
This design is called a Yagi-Uda array, after its creators.
Again, the length, size and position of the reflector affect the aerial's properties, but we won't go into that here.
The reflector can take the shape of a metal plate (with holes in it, making the aerial more impervious to wind) or several rods spaced equidistant from the centre of the dipole.
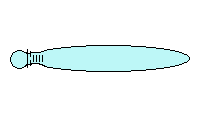
The result is that there is less gain behind the aerial and more, where we want it to be, in front:
Folded Dipoles
In order to minimise signal loss it is important that the impedance (a sort of resistance for AC) of the dipole matches that of the feeder cable and the receiving set.
The impedance for the type of dipole discussed above is about 75 ohms. More often than not though the impedance needs to be altered to match the cable and receiving set characteristics.
This change of impedance is acheived by folding a rod over so that its folded length is still half-a-wavelength:
Now we know what each constituent part of an aerial is called and what its function is, let's look at some examples in the field.
Practical Examples of Aerial Design